Coconut Milk Leave In Conditioner

Coconut Milk Leave In Conditioner: Unbelievably simple 

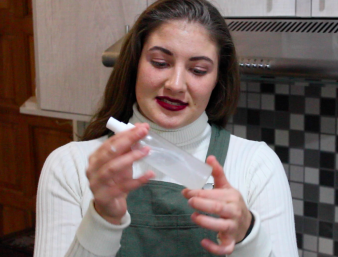
This leave in conditioner is supposed to add shine making your hair look healthier by nourishing your hair with its proteins, fat content and vitamin E that it contains. I have currently used it a few times and have found my hair having a beautiful glow and lovely smooth feel. According to other bloggers it also helps restore thinning damaged hair and acts as a detangler unfortunately I have not used it long enough to see those effects but will definitely update this blog post after using it for longer. For now though I do notice how nourished it makes my hair look and feel.

What you need:

  • Distilled water
  • Coconut milk
  • Spray bottle
  • Container that can be place in freezer

What to do:

  1. Place 1/4 cup of distilled water in the spray bottle.Screen Shot 2016-05-10 at 6.19.18 AM.png
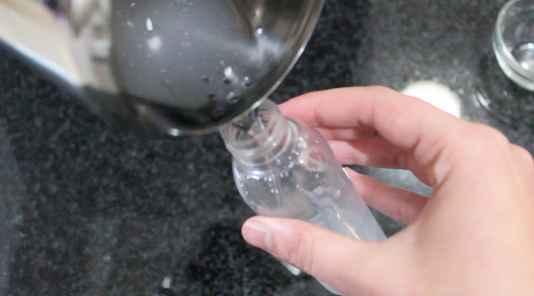
  2. Then place 1 tablespoon of coconut milk in spray bottle.
  3. Place lid on spray bottle then shake.Screen Shot 2016-05-07 at 1.22.40 PM
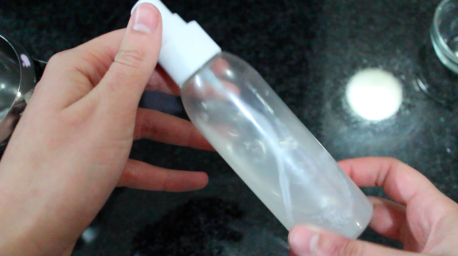
  4. And there we have it now you can spray it on dry or wet hair.Screen Shot 2016-05-07 at 1.25.05 PM.png


Storing:
This recipe allows you to make a small amount of the product as natural products go off really fast.You can now place the remaining coconut milk in the freezable container and pop it in the freezer for later or use it in cooking.The distilled water can be put in the fridge along with the spray when no in use.

Nourishing Bar To Fight Dry Skin This Winter

Nourishing coconut lotion barIMG_0930

Yip its not a cream ,oil or soap…its a bar. This bar is great for nourishing the skin and rehydrating it to prevent or cure the dreaded dry winter skin. This bar is simple to make, is natural and also has many benefits for the skin. This bar has a similar effect like baby oil, it won’t clean your skin but coats it in hydrating oils that will soak into your skin.

What you need:IMG_0916

  • 2/4-3/4 cups Coconut oil
  • 1/4-2/4 cups Pure beeswax
  • As many drops as desired of essential oils (optional) e.g) lavender,
    rosemary, vanilla etc.
  • 1teaspoon-1tablespoon Olive oil/ sun flower oil (optional)
  • Saucepan
  • Tin/muffin-pan/lotion mould

Note: The ingredients can be adjusted to make a softer or harder bar that can be applied much easier or harder onto the skin.Less beeswax makes the bar softer more makes it harder.

How to make it :

  1. 
Heat up the saucepan.
    Add the coconut oil ,beeswax and the other oils if you decided to use them.IMG_0920
  2. Continuously mix until melted.
    Remove from heat, immediately add essential oils and mix in the essential oils(optional).IMG_0923
  3. Place the still hot liquid in a container, wait to cool or in a rush pop it in the fridge/freezer.once cooled should pop right out of the mould IMG_0933
  4. Enjoy crusty free skin.

Tips:

  1. Break the beeswax in to small chunks to allow it to melt faster.
  2. Struggling to measure out the cups? melt the beeswax/coconut oil separately, continuously pouring the liquid into the measuring cup and out until you reach desired amount.

How to use the bar:
The bar is not used in the shower/bath it is applied after you shower/bath, you apply it to your warm dried skin. The warm skin should melt or soften the bar allowing the oils to be applied to your skin. If your skin is cold warm up the bar by either rubbing it between your hands or giving it a quick blow-dry with your hairdryer.If you make it the right constancy it should apply onto the skin just fine. Cream can also be used after the bar.

Natural Makeup Setting Spray

Make up setting spray

Well I’m sure that anyone that wears makeup worries about the makeup fading or melting off their face.Yes we all know that moment when you look in the mirror after you had just applied your makeup then, two hours later you look in the mirror again and are shocked to see your eyeshadow hanging off your eyelids.This setting spray is easy to make, natural and surprisingly light on the face but does it work?

What you needIMG_0871

  • A spray bottle.
  • aloe vera gel (99-100% pure).
  • Warm water.

What to do:

  1. Place 1/4 of the spray bottle with aloe vera gel.IMG_0874
  2. place the rest of the bottle with warm water (3/4).IMG_0876
  3. shake well and spray after you apply your makeup or before and after.IMG_0879

The test

I sprayed the setting spray ,applied makeup on then sprayed again and left the make up on for 3 hours to test and my verdict is… it does work. I will definitely test it for longer period next time.This setting spray is light on the face and has a slight fresh smell from the aloe vera gel.

Eyebrow Thickener (does it work?)

Eyebrow Thickener
Recently having thick perfect eyebrows have became the trend by being put in songs, vines etc. Making many insecure. So I decided to try out a DIY eyebrow thickener serum that stated it should show results in two weeks and it did. In fact the results were not that bad for the amount of time it said it would work my eyebrows did appear thicker. So this DIY idea is definitely a DI-do. Wanna know how to make this two ingredient serum?

eyebrow

IMG_0402

What you need:

  • Castor oil.
  • Rosemary essential oil.
  •  A mascara container or a container with a rollie ball on top.

What to do:

  1. Fill container nearly to the top with castor oil. IMG_0403
  2. Add three drops of rosemary essential oil.IMG_0404
  3.  Shake it.
  4. Apply every morning and evening.IMG_0405

Moisturising lavender and rosemary exfoliator

Struggle with dry skin and want an exfoliator that also has a moisturising element this is for you. This exfoliator isn’t sweet smelling but has a very prominent herbal smell. For those with sensitive skin remove the course salt and replace with either plain salt or more sugar.

Moisturising Lavender rosemary body scrub

What you need:
• 2 lavender spikes and stems with leaves.IMG_0468
• Rosemary essential oil.
• 2 table spoons of coconut oil.
• 2 tablespoons of olive oil.
• 2/3 cups salt
• 2/3 cup granulated sugar.
• Container.

What to do:
1. Add olive oil to a container.IMG_0474
2. Add sugar and mix.IMG_0475
3. Add coconut oil and remove flowers from one spike and leaves from one stem.IMG_0479
4. Add 2 drops of rosemary essential oil then mix.IMG_0477
5. Add the salt, one drop of rosemary essential oil and add the last rosemary flower and stem(repeat from number 3).IMG_0480
6. Mix until everything is blended and no oil is sitting at the bottom.IMG_0483
7. Done.

Take note:
If you are pregnant and in your first trimester do not use rosemary essential oil replace with rosemary plant leaves. Also avoid the essential oil if you have very sensitive skin.

Pore Shrinking Mask

Honey Yogurt Mask

Not only does it taste great but this mask works wonders for shrinking pores and reducing redness on your face. It is important to note that you will only notice a slight difference with one application but with continuous use the difference will definitely be evident.IMG_2909

Ingredients: for multiple applications

  • 1 tablespoons of full cream yogurt.
  • 1 tablespoon of honey.
  • 1 teaspoon of lemon.
  • 1 teaspoon of cinnamon. (optional)

Note: Ingredients will need to be adjusted drastically to make it into a single application.

What to do:

  1. Add all ingredients together.PicMonkey Collage
  2. Mix until all ingredients have blended together.
  3. Apply to face in small circular motions.
  4. Leave on for 20 minutes.
  5. Remove with warm damp cloth.
  6. Repeat 3 times a week.
  7. Add leftovers in a airtight container and place in fridge use within -+7 days.

How it works:  

Cinnamon: acts as a facial scrub that will remove dead skin.

Honey: Acts as an exfoliator and also aids in clearing blemishes.

Yogurt: Dissolves dead skin and soothes redness helping remove and reduce it also assists in shrinking pores.

Lemon: Help reduce appearance of facial scars and marks.

DIY Vanilla Coconut Lip Balm

Natural lip balm  PicsArt_1428413315902

This natural lip balm is outrageously simple to make the only problem would be finding where to purchase beeswax. Making your own lip balm is great because you know exactly what ingredients go into the balm and Most of the ingredients for this recipe should be in majority of people’s cupboards. I am extremely happy with this lip balm as it is extremely nourishing and will quickly get those chapped lips back to its soft plump old self.

Just a heads up:

The beeswax has a very prominent smell and is hard to remove, so the final product will still have a beeswax smell. I haven’t tried this yet but I think that by adding either more essential oils or vanilla might cover the smell.

What you need:photo 2

  • 15 grams beeswax
  • 10 grams castor oil or olive oil
  • 47 grams coconut oil
  • 22 grams of sunflower oil
  • +/-2 tablespoon (depending on intensity of vanilla flavor wanted can add more)of vanilla extract/ 25 drops vanilla absolute oil(preferred).
  • Optional 1 table spoon raw honey.
  • Lip balm container and container for leftovers.

What to do:

  1. Place all ingredients except vanilla extract in a metal/glass bowl over boiling water on stove to melt and mix ingredients. photo 1
  2. once everything has melted and mixed Add vanilla extract.PicMonkey Collage
  3. once everything is mixed remove from heat and place in container, wait for it to cool and solidify then it’s ready to use.photo 5

Extras:

  1. Can change vanilla extract by adding other essential oils instead.
  2. Can add food colouring to take the drab original colour to a fab colour of your choice.
  3. Can add petals and glitter.

Quick And Easy Body Scrub

Coffee sugar body scrub

IMG_2497

co

Scrubs are a form exfoliating that help cleanse the skin and is important to do every 1 or 2 weeks .This body scrub recipe is something  I’ve been using for about a year because it is easy to make and leaves my skin feeling smooth and looking healthy.

Benefits of scrubbing:

  • Prevent ingrown hairs after shaving or waxing
  • Helps remove dead skin leaving it looking and feeling great.


What you need:

  • Container to place the scrub inPicsArt_1423999871690
  • 1/2 +- cup of sugar
  • 1/4-+ cup of lemon juice
  • 1/8+- cup of granulated coffee

These are estimate measurements you can adjust it according to the size of the container you are using and how much of the coffee or lemon juice you want. I usually just wing it, as long as the scrub has enough lemon juice so that all the sugar is wet and enough coffee to make the scrub look a light to dark brown.

Substitute:

You can remove the lemon juice and replace it with olive oil if you have dry skin.

How to make the scrub:

Step 1: add the dry ingredient to the container.

IMG_2493-1

Step 2: Add the lemon juice and mix ingredients well until all the sugar is wet.

IMG_2495-1

Step 3:  Apply to body in shower or bath rub in a circular motion.

IMG_2497

Homemade sunburn skin repair treatment (tried and tested)

Homemade sunburn skin repair treatment (tried and tested)

image from: stylelist.com

We all get sunburn sometime in our lives weather it’s while tanning, playing sport, being outdoors, forgetting to re-apply or not putting sunblock on at all we all have our stories of how we got our lovely but dangerous shades of red.

Once you are burnt worrying what people think about you looking like a tomato should be the least of your problems. When the burning pain kicks in and in more severe cases, blisters that may appear. You should rather be worrying or trying to repair the skin to prevent premature aging (wrinkles), sunspots, Skin cancer etc.

To help get your skin in a better condition I have put together some body treatment with ingredients that should already be in your kitchen. So let’s get repairing.

Lemon yogurt body mask:

This mask acts as a multi-treatment as it exfoliates, repairs, hydrates

from: readanddigest.com

What you need:

  • ½ cup of plain yogurt (helps get rid of dead skin, hydrate, bring down redness and inflammation.)
  • 3 Tbs of lemon juice (healing properties, exfoliates and helps with reducing appearance in sunspots and scars. )
  • ¼ cup of sugar (exfoliates by scrubbing off dead peeling skin.)

What to do:

  • Mix all ingredients together
  • Apply all over body/face for 10-20 minutes three times a week
  • Rinse off with cool-cold water

Warning: if skin becomes irritated remove immediately

Other tips to help reduce signs and help repair skin:

  • Aloe Vera gel available in pharmacy’s
  • Drink lots of water
  • Constantly hydrate skin with body creams
  • Eat foods that will help repair skin.(soon be available on my blog.)
  • A combination of both a good skin regime and eating will speed up recovery and reduce the effects.

Future prevention:

  • Place sunblock on regularly.
  • Buy sunblock that protects from UVA and UVB and has a high SPF of 50 up.

References:

http://www.newhealthguide.org/Lemon-Juice-On-Skin.html

http://www.stylecraze.com/articles/10-amazing-beauty-benefits-of-yogurt-for-skin-and-hair/

http://www.webmd.com/skin-problems-and-treatments/guide/sunburn?page=2